Completando a la entrada anterior he de decir que la gama de marcas de las que disponemos estas interesantes microfichas despiece se amplia hasta completar las cuatro marcas japonesas y alguna que otra más.
Podemos encontrar muchisimos modelos de cada marca, y de cada modelo despieces de todos los años que se ha estado fabricando. Están disponibles las siguientes marcas:
We can find many models of each brand, and each model cuts of all the years that has been manufacturing. Available are the following brands:
- Suzuki.
- Honda.
- Yamaha.
- Kawasaki.
- KTM.
Son dos webs francesas muy completas que están disponibles en varios idiomas.
Hala, a desmontar todo el mundo las motos!!
They are two webs french very complete that are available in several languages. Let´s go, to dismantle all over the world the motorcycles!!
A continuación dejo un par de enlaces:
http://www.bike-parts.fr/
http://fr.microfiches.net/
Saludos mierdas.

La gasolina arde en nuestras venas... pero es de poco octanaje.
Mostrando entradas con la etiqueta MECÁNICA. Mostrar todas las entradas
Mostrando entradas con la etiqueta MECÁNICA. Mostrar todas las entradas
martes, 20 de diciembre de 2011

domingo, 18 de diciembre de 2011
Piezas y recambios originales Suzuki
Si quieres consultar el precio de cualquier pieza de tu moto, entre un montón de modelos, donde incluso se puede elegir el año de fabricación y consultar microfichas donde aparecen incluso despieces, no dejes de visitar esta web http://www.pieces-suz.com/suzuki-identification-bike-model_nn.php?ChildNavID=1147 , es francesa pero está disponible en varios idiomas. Me ha gustado mucho pues la encuentro muy completa.
Espero os sea de utilidad.
Espero os sea de utilidad.
lunes, 31 de enero de 2011
Transformación Ducati Indiana: Parte 6. "Las ruedas". Processing Ducati Indiana: Part 6. "Wheel".
Nota: Pinchando en la etiqueta "DUCATI INDIANA TRANSFORMADA" puedes ver la historia completa.
.
Para conseguir un aspecto más bobber tendremos que sustituir las ruedas de la Indiana, que son de aleación, por unas de radios, con un toque más clásico. Una buena opción es utilizar las de una Cagiva Elefant. Esta moto nos dará un mundo lleno de posibilidades e ilusiones. Si podemos conseguir una tendremos practicamente otra Indiana, pero de campo. El motor de esta moto es el mismo que el de la Ducati Indiana, pero con arranque a patada. Otro toque especial para nuestra bobber.
Bueno, pues eso, que ya tenemos una Elefant en nuestro taller. Con menos papeles que una liebre, pero entera. La he desmontado tan deprisa que no caí en hacer alguna foto.
To achieve an aspect more bobber we will have to replace the wheels of the Indiana, which are of alloy, by some of radios, with a touch more classic. A good option is to use a Gruppo Cagiva elefant. This bike will give us a world full of possibilities and dreams. If we can get a we will have practically no other Indiana, but in the field. The engine of this bike is the same as that of the Ducati Indiana, but with boot to kick. Another special touch to our bobber.
Good, because that, that we already have an elefant in our workshop. With fewer roles that the hare, but whole. I have dismantled so fast that i thought of to make some photo.

 Fotos 40 y 41: Para montar la rueda delantera de la Elefant de 21" necesitamos un tornero que nos fabrique un casquillo separador para el amortiguador derecho. El interior del casquillo tiene el diametro de la parte fina del eje de la Elefant. Utilizaremos el eje de la Elefant pero lo meteremos del lado contrario al que va originalmente, de manera que el pasador queda al lado izquierdo.

 Fotos 42 y 43: Ooooooooooooooooooooooooooohhh!!!!!!!!!! Qué líneaaaaaa!!!!!!!!!!
.
Para conseguir un aspecto más bobber tendremos que sustituir las ruedas de la Indiana, que son de aleación, por unas de radios, con un toque más clásico. Una buena opción es utilizar las de una Cagiva Elefant. Esta moto nos dará un mundo lleno de posibilidades e ilusiones. Si podemos conseguir una tendremos practicamente otra Indiana, pero de campo. El motor de esta moto es el mismo que el de la Ducati Indiana, pero con arranque a patada. Otro toque especial para nuestra bobber.
Bueno, pues eso, que ya tenemos una Elefant en nuestro taller. Con menos papeles que una liebre, pero entera. La he desmontado tan deprisa que no caí en hacer alguna foto.
To achieve an aspect more bobber we will have to replace the wheels of the Indiana, which are of alloy, by some of radios, with a touch more classic. A good option is to use a Gruppo Cagiva elefant. This bike will give us a world full of possibilities and dreams. If we can get a we will have practically no other Indiana, but in the field. The engine of this bike is the same as that of the Ducati Indiana, but with boot to kick. Another special touch to our bobber.
Good, because that, that we already have an elefant in our workshop. With fewer roles that the hare, but whole. I have dismantled so fast that i thought of to make some photo.

 Fotos 40 y 41: Para montar la rueda delantera de la Elefant de 21" necesitamos un tornero que nos fabrique un casquillo separador para el amortiguador derecho. El interior del casquillo tiene el diametro de la parte fina del eje de la Elefant. Utilizaremos el eje de la Elefant pero lo meteremos del lado contrario al que va originalmente, de manera que el pasador queda al lado izquierdo.
Está claro, no? Bueno, muy claro no, pero el caso es que se puede montar.
La rueda trasera se monta directamente, sin modificaciones. Los bujes de las dos motos son iguales. La única "pegueja" es que la Elefant monta detrás llanta de 17" y los neumáticos de banda blanca se fabrican como mucho en 16". Por lo que tendremos que radiar para reducir el diametro. Pero lo haremos más adelante, cuando pintemos las ruedas. De momento para hacernos una idea de cómo queda todo montado así vale. Le ponemos alguna cosilla más provisionalmente com el faro, el cuelgamonos y las plataformas, y aquí tenemos el resultado.
To mount the front wheel of the elefant 21" we need a lathe operator that we manufactured a collet separator for the damper right. The interior of the cap has the diameter of the thin part of the axis of the elefant. We will use the axis of the elefant but go blundering the opposite side to that is originally so that the bolt is on the left side.
It is clear, not? Good, very clear, but the case is that it can be mounted.
The rear wheel is mounted directly, without modifications. The hubs of the two motorcycles are equal. The only downside is that the elefant mounts behind rim of 17" and the tires of white band is produced as much as 16 ". We will have to radiate to reduce the diameter. But we will do so later on, when elevating the wheels. At the moment to get an idea of how it all mounted well worth. We can do something more provisionally com the lighthouse, the cuelgamonos and platforms, and here we have the result.

 Fotos 42 y 43: Ooooooooooooooooooooooooooohhh!!!!!!!!!! Qué líneaaaaaa!!!!!!!!!!
Oooooooooooooooooooooooohh!!!!! That lineeeeeee!!!!!!!!!
.
.
.
.
By Pedro "Eltirao".
Transformación Ducati Indiana: Parte 5. "El asiento". Processing Ducati Indiana: Part 5. "The seat".
Nota: Se recomienda ver antes todos los capítulos anteriores de la transformación. Pinchando en la etiqueta "DUCATI INDIANA TRANSFORMADA" tienes la historia completa.
.
El asiento de muelles, obligado en toda bobber que se precie. Yo utilizaré uno comprado por catálogo y sustituiré los muelles para adaptarlo.
The seat of docks, forced throughout bobber which is worthy. I will use one bought by catalog and replacing him the docks to be adapted.

 Fotos 27 y 28: En primer lugar desmontar el asiento, que está nuevecito, recién sacado del paquete, sin tener la certeza de que quede bien tras la operación. Para esto tendremos que taladrar los remaches.
In the first place dismount the seat that is brand new, freshly package, without having the certainty that it is well after the operation. For this we will have to drill the rivets.

 Fotos 29 y 30: Le soldamos a la base dos esparragos, retrasados con respecto a los originales, donde introduciremos los muelles.
 Foto 31: Probamos los muelles para ver que tal quedan.
.
El asiento de muelles, obligado en toda bobber que se precie. Yo utilizaré uno comprado por catálogo y sustituiré los muelles para adaptarlo.
The seat of docks, forced throughout bobber which is worthy. I will use one bought by catalog and replacing him the docks to be adapted.

 Fotos 27 y 28: En primer lugar desmontar el asiento, que está nuevecito, recién sacado del paquete, sin tener la certeza de que quede bien tras la operación. Para esto tendremos que taladrar los remaches.
In the first place dismount the seat that is brand new, freshly package, without having the certainty that it is well after the operation. For this we will have to drill the rivets.

 Fotos 29 y 30: Le soldamos a la base dos esparragos, retrasados con respecto a los originales, donde introduciremos los muelles.
Welded to the base two asparagus, lagging behind the original, where we will introduce the docks.
 Foto 31: Probamos los muelles para ver que tal quedan.
We tried the docks to see out.


Fotos 32 y 33: Ale, a montar el asiento!! He aprovechado para poner los remaches negros. Como no he encontrado pues los pinto. Será por recursos!! Ja!!!


Fotos 32 y 33: Ale, a montar el asiento!! He aprovechado para poner los remaches negros. Como no he encontrado pues los pinto. Será por recursos!! Ja!!!
To mount the seat! I took advantage to put the rivets blacks. As i have not found blacks, the paint. It will be for resources! Ja!!!


 Fotos 34, 35 y 36: En la parte delantera del asiento tendremos que fabricar una especie de bisagra. Al chasis le soldaremos estas pletinas taladradas a medida de un bulón que nos encontramos hace mil años al saber donde, y que guardamos cuidadosamente.


 Fotos 34, 35 y 36: En la parte delantera del asiento tendremos que fabricar una especie de bisagra. Al chasis le soldaremos estas pletinas taladradas a medida de un bulón que nos encontramos hace mil años al saber donde, y que guardamos cuidadosamente.
On the front of the seat we will have to produce a sort of hinge. The chassis you soldaremos these decks mortised templated as a sprocket cluster that we are a thousand years ago to know where, and which we carefully.
 Foto 37: Bajo el asiento quitamos el soporte original y montamos uno también fabricado artesanalmente aprovechando los mismos tornillos del otro. Este soporte es simple. Una pletina de acero y en un extremo un casquillo soldado por donde pasaremos el bulón.
 Foto 37: Bajo el asiento quitamos el soporte original y montamos uno también fabricado artesanalmente aprovechando los mismos tornillos del otro. Este soporte es simple. Una pletina de acero y en un extremo un casquillo soldado por donde pasaremos el bulón.
Under the seat we took down the original media, and we rode one also handmade by drawing on the same screws of the other. This support is simple. Deck steel at one end a collet soldier by where we spend the chainplates.
 Foto 38: Detalle de la bisagra terminada.
 Foto 38: Detalle de la bisagra terminada.
Detail of the hinge completed.
 Foto 39: Ya tenemos nuestro asiento al más puro estilo bobber.
 Foto 39: Ya tenemos nuestro asiento al más puro estilo bobber.
We already have our seat in the purest style bobber.
.
.
.
By Pedro "Eltirao".
miércoles, 29 de diciembre de 2010
Transformación Ducati Indiana: Parte 4. "Amortiguador delantero". Processing Ducati Indiana: Part 4. "Front damper"
Nota: Se recomienda leer antes las partes anteriores de este artículo. Pinchando en la etiqueta "DUCATI INDIANA TRANSFORMADA" encontrarás la transformación completa.
Con las nuevas dimensiones del chasis el asiento queda más bajo y, cuando montemos los nuevos amortiguadores traseros, que son mucho más cortos, quedará aún más. Por lo tanto, se hace necesario bajar un poco la suspensión delantera. Como es poco con montar un separador para acortar el recorrido será suficiente.
With the new dimensions of the chassis the seat it is lower and, when maxillarymodel new rear shocks, which are much shorter and will be even more. Therefore, it becomes necessary to lower a little front suspension. As there is little to mount a separator to shorten the path will be sufficient.

 Fotos 23 y 24: Sacamos el muelle y descubrimos que lleva un tubo separador. Esto nos facilita no tener que tocar el muelle, y cortar el tubo separador será más fácil, pero antes de esto montaremos un separador en el tubo amortiguador.
 Foto 25: Vaciamos el aceite por un tapón que lleva en la parte baja del amortiguador y quitamos el tornillo allen para liberar el mecanismo.
 Foto 26: Esto es el tubo amortiguador y donde marca la flecha es donde se instala el separador, entre el muelle y el émbolo. Este émbolo tiene un aro de teflón, se mide el diametro y se fabrica el separador de diametro un poco menor y longitud 40 mm.
Con las nuevas dimensiones del chasis el asiento queda más bajo y, cuando montemos los nuevos amortiguadores traseros, que son mucho más cortos, quedará aún más. Por lo tanto, se hace necesario bajar un poco la suspensión delantera. Como es poco con montar un separador para acortar el recorrido será suficiente.
With the new dimensions of the chassis the seat it is lower and, when maxillarymodel new rear shocks, which are much shorter and will be even more. Therefore, it becomes necessary to lower a little front suspension. As there is little to mount a separator to shorten the path will be sufficient.
 Foto 22: Quitamos el tapón superior con "cuidadín" de que el muelle interior no salga disparado.
We took the stopper top with care that the pier interior do not exit shot.

 Fotos 23 y 24: Sacamos el muelle y descubrimos que lleva un tubo separador. Esto nos facilita no tener que tocar el muelle, y cortar el tubo separador será más fácil, pero antes de esto montaremos un separador en el tubo amortiguador.
We got the pier and we discovered that has a tube separator. This gives us not having to play the quay and cut the pipe separator will be easier, but before this whichwill a separator in the tube damper.
 Foto 25: Vaciamos el aceite por un tapón que lleva en la parte baja del amortiguador y quitamos el tornillo allen para liberar el mecanismo.
We empty the oil by a screw that leads in the lower part of the shock absorber and take away the screw allen to release mechanism.
 Foto 26: Esto es el tubo amortiguador y donde marca la flecha es donde se instala el separador, entre el muelle y el émbolo. Este émbolo tiene un aro de teflón, se mide el diametro y se fabrica el separador de diametro un poco menor y longitud 40 mm.
Como el recorrido ahora es menor, para que la suspensión no quede dura tendremos que cortar el tubo separador que aparecía en la foto junto al muelle largo. Lo cortamos la misma longitud o un poco menos si la suspensión estaba un poco blanda del uso.
Solo queda montar, echar el aceite (0,5 l en este caso) y quedan listos para poner en las tijas.
This is the tube shock absorber, and where the arrow is where you installed the separator between the pier and the plunger. This plunger has a ring of teflon, is used to measure the diameter and factory the separator in diameter a little smaller and length 40 mm.
As the tour is now less, that the suspension is not hard we will have to cut the pipe separator that appeared in the photo alongside the quay long. As we cut the same length or a little less if the suspension was a little soft of the use.
There is only mount, put some oil (0.5 l in this case) and are ready to put into the seat post.
.
.
.
Articulo redactado por Pedroeltirao.
Article written by Pedroeltirao.
miércoles, 17 de noviembre de 2010
Tabla de holguras para reglajes de válvulas de motocicletas y cuatriciclos.

LO SENTIMOS PERO EL ENLACE YA NO CONDUCE A LA TABLA DE HOLGURAS.
Para los manitas que os guste hacer las reparaciones y mantenimiento de vuestras máquinas (como hago yo, hasta que la rompa, claro) quizás os venga bien esta tabla que he encontrado en la web.
Para los manitas que os guste hacer las reparaciones y mantenimiento de vuestras máquinas (como hago yo, hasta que la rompa, claro) quizás os venga bien esta tabla que he encontrado en la web.
En el caso de mi moto (Suzuki DR 650 RSE), los valores coinciden con los del manual de despiece que siempre es lo más fiable. Confio que en el resto de modelos también estén bien, pero yo me lavo las manos.
Saludos "almas mierdas".
Fuentes:
Tabla holguras: http://www.macacustomalbacete.com/
Dibujo: http://www.cuentocuentos.net/
miércoles, 29 de septiembre de 2010
Transformación Ducati Indiana: Parte 3. "Chasis 2ª parte". Processing Ducati Indiana. Part 3. "Chassis part 2".
Nota: Se recomienda leer antes las Partes 1 y 2 de la transformación. Pinchando en la etiqueta "DUCATI INDIANA TRANSFORMADA" aparecerá la historia completa.

 Fotos 12 y 13: Justo por debajo de los muelles del asiento, soldada al planchón, colocamos esta barra traspasada con un taladro de 14 mm ("peazo" broca tiene que tener el tornero Carlos de Rectimansa al que agradecemos sus esfuerzos). Tiene una parte rectificada para que siente de plano en el planchón. La misión de esta barra es sujetar los amortiguadores en su parte alta. Con varilla roscada traspasamos el conjunto como si de una banderilla en vinagre se tratara.
 Foto 14: Para terminar el subchasis unimos el planchón y la barra taladrada con el chasis por debajo del soporte motor que fabricamos (foto 10). Lo hacemos con tubo estructural del que nos quedó, sí... la "barreja" de 6 metros, ya queda menos "pa gastala". Dándole un poco de curva para que aloje el colector de escape del cilindro trasero y nos quede un poco más de hueco para meter algo debajo del sillín (un depósito adicional, la batería si coge... o a saber qué metamos).
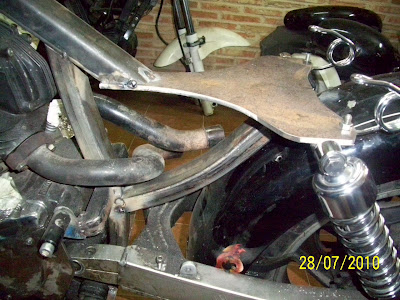 Foto 15: Pues así queda esto, con los amortiguadores y los muelles del asiento puestos. Bien, no?
 Foto 16: Detalle del acabado sin refinar del ángulo "raro" que queda en la unión del tubo estructural y el chasis.
 Foto 17: Pues nada, aquí tenemos nuestro chasis recién salido del horno. Ahora toca desmontar todo y llamar al amigo Jesús a ver si nos lo suelda un domingo que no se le junte mucho. Que no se le junte mucho el sábado por la noche, no el domingo.
 Foto 11: Comenzamos a construir el subchasis fabricando este bello planchón con la forma del asiento, hacemos unos taladros donde van alojados los tornillos que sujetan los muelles del asiento y lo punteamos al chasis justo donde termina la "espina dorsal".
We began to build up the small 'damper' rods manufactured this beautiful iron with the shape of the seat, we do a few holes where are housed the screws that attach the docks of the seat and the punteamos to the chassis just where he finishes the "backbone".

 Fotos 12 y 13: Justo por debajo de los muelles del asiento, soldada al planchón, colocamos esta barra traspasada con un taladro de 14 mm ("peazo" broca tiene que tener el tornero Carlos de Rectimansa al que agradecemos sus esfuerzos). Tiene una parte rectificada para que siente de plano en el planchón. La misión de esta barra es sujetar los amortiguadores en su parte alta. Con varilla roscada traspasamos el conjunto como si de una banderilla en vinagre se tratara.
Just below the piers of the seat, welded to the iron and put this bar transferred with a drill of 14 mm (piece of broca has to have the turner Carlos Rectimansa we are grateful for their efforts).It has a party rectified for that feels background on the iron. The mission of this bar is to hold buffers in its upper part. With threaded rod we crossed some the whole as if a banderilla in vinegar.
 Foto 14: Para terminar el subchasis unimos el planchón y la barra taladrada con el chasis por debajo del soporte motor que fabricamos (foto 10). Lo hacemos con tubo estructural del que nos quedó, sí... la "barreja" de 6 metros, ya queda menos "pa gastala". Dándole un poco de curva para que aloje el colector de escape del cilindro trasero y nos quede un poco más de hueco para meter algo debajo del sillín (un depósito adicional, la batería si coge... o a saber qué metamos).
To complete the small 'damper' rods join iron and punching bar with the chassis below the motor support that we manufacture (Photo 10). We do so with structural tube that we stayed, if ... the bar of 6 meters, since there is less to spend. Giving a little curve to that stayed the exhaust manifold of the rear cylinder and we stayed a little more than hollow to put something under the saddle (an additional deposit, the battery if you take ... or to know that roam down).
 Foto 15: Pues así queda esto, con los amortiguadores y los muelles del asiento puestos. Bien, no?
Since it was this, with the shock absorbers and the docks of the seat posts. Well, no?
 Foto 16: Detalle del acabado sin refinar del ángulo "raro" que queda en la unión del tubo estructural y el chasis.
Detail of the finish without refining of the angle that is in the union of the structural tube and a chassis.
 Foto 17: Pues nada, aquí tenemos nuestro chasis recién salido del horno. Ahora toca desmontar todo y llamar al amigo Jesús a ver si nos lo suelda un domingo que no se le junte mucho. Que no se le junte mucho el sábado por la noche, no el domingo.
Because nothing, here we have our chassis just out of the oven. It is now unmount everything and call your friend Jesus let us see if the weld a Sunday that he was not gathered much. That he was not gathered much on saturday night, not the Sunday.
 Foto 18: Ya está aquí el domingo, el chasis preparado, y Jesús con el pulso "regulero".
 Foto 18: Ya está aquí el domingo, el chasis preparado, y Jesús con el pulso "regulero".
It's all here the Sunday, chassis prepared, and Jesus with the regular pulse.
 Foto 19: Cordón tras cordón la mañana va pasando y el amigo Jesús se fusiona con su pinza de soldar como si fuesen uno. Transformándose en una máquina de fundir metal casi perfecta.
 Foto 19: Cordón tras cordón la mañana va pasando y el amigo Jesús se fusiona con su pinza de soldar como si fuesen uno. Transformándose en una máquina de fundir metal casi perfecta.
Cordon after cordon the morning runs through and friend Jesus fuses with the clamp to weld as if they were one. By becoming a machine of melt metal almost perfect.
 Foto 20: Una cervecita rápida para afinar aún más y... el chasis terminado.

"DESPUÉS"
 Fotos 20 y 21: El antes y el después del chasis visto por detrás.
 Foto 20: Una cervecita rápida para afinar aún más y... el chasis terminado.
A quick beer to further sharpen and ... the chassis finished.
"ANTES"
"ANTES"

"DESPUÉS"
 Fotos 20 y 21: El antes y el después del chasis visto por detrás.
Before and after the chassis viewed from the rear.
.
.
.
.
Artículo redactado por Pedroeltirao.
Article written by Pedroeltirao.
jueves, 16 de septiembre de 2010
Transformación Ducati Indiana: Parte 2. "Chasis 1ª parte". Processing Ducati Indiana. Part 2 "Chassis part 1".
Nota: Se recomienda leer antes la Parte 1 de la transformación. Pinchando en la etiqueta "DUCATI INDIANA TRANSFORMADA" aparece la historia completa.

 Fotos 6 y 7: El siguiente paso es reconstruir el chasis dejándolo mucho más estilizado y mejorado. Para ello empezamos por lo que es la espina dorsal, se trata de un tubo estructural de 4 mm fabricado por uno de los secuaces de mi cuñado Víctor, agradecimientos.
The next step is to rebuild the chassis leaving much more stylish and improved. For this reason we started so that it is the backbone, it is a structural tube 4 mm manufactured by one of the henchmen of my brother Victor, thanks.
 Foto 8: En la parte inferior del chasis, al ser doble cuna, tenemos un tubo a cada lado del motor. Originalmente subían abrazando el motor y se unían debajo del depósito. Ahora los uniremos por detrás del motor en su parte baja con cuadradillo macizo de 30x30 mm suministrado por Hierros Álvarez, agradecimientos. En la parte derecha va atornillado para poder desmontar el chasis y sacar el motor, en el otro lado va soldado al chasis.
 Foto 9: Llegados a este punto sólo tenemos que unir lo que denominábamos "espina dorsal" con la parte central del cuadradillo. Lo hacemos con tubo estructural de 50x30x3 mm (como no lo he conseguido "de gratis" he tenido que comprar 6 metros sólo, me sobran 5,5), curvándolo se adapta al basculante y al motor, se puntea y con ésto ya tenemos formada la cuna motor. El siguiente paso es fabricar el subchasis, que será el encargado de soportar nuestras delicadas posaderas.
 Foto 10: Detalle del soporte motor trasero superior que fabricamos para sustituir los originales que perdimos al cortar el chasis. Va soldado al tubo que montamos en el paso anterior.
 Foto 5: Esto es lo que sobra tras cortar. Nos pasaremos esta noche por el centro de reciclado "el chuchi" y se lo dejaremos en la puerta, total nos vas a pagar lo mismo..."ná".
This is what's left after cutting. We will pass this evening by the recycling center "chuchi" and we'll leave at the door, we're going to pay the same ... nothing.

 Fotos 6 y 7: El siguiente paso es reconstruir el chasis dejándolo mucho más estilizado y mejorado. Para ello empezamos por lo que es la espina dorsal, se trata de un tubo estructural de 4 mm fabricado por uno de los secuaces de mi cuñado Víctor, agradecimientos.
Este tiene que tener la medida exterior exacta para ser introducido en el tubo del chasis, y le practicamos un corte para curvarlo un poco y que la moto quede en su parte trasera lo más baja posible.
Al terminar de puntearlo comprobamos que está en el sitio ya que sería bueno que la moto circulase en línea recta sin muchos problemas.
The next step is to rebuild the chassis leaving much more stylish and improved. For this reason we started so that it is the backbone, it is a structural tube 4 mm manufactured by one of the henchmen of my brother Victor, thanks.
This has to have the measure outside accurate to be introduced to the tube of the chassis, and practicing a court for curvarlo a little, and that the motorcycle is left in your rear as low as possible.
At the end of puntearlo we have seen this in the site since it would be good that the motorcycle circulate in a straight line without too many problems.
 Foto 8: En la parte inferior del chasis, al ser doble cuna, tenemos un tubo a cada lado del motor. Originalmente subían abrazando el motor y se unían debajo del depósito. Ahora los uniremos por detrás del motor en su parte baja con cuadradillo macizo de 30x30 mm suministrado por Hierros Álvarez, agradecimientos. En la parte derecha va atornillado para poder desmontar el chasis y sacar el motor, en el otro lado va soldado al chasis.
On the bottom of the chassis, the be double cradle, we have a tube on each side of the engine. Originally came embracing the engine and unite under the deposit. Now the knit behind the engine in its lower part with cuadradillo massif of 30x30 mm supplied by Hierros Álvarez, thanks. On the right side will be bolted to dismount the chassis and get the engine, on the other side is welded to the chassis.
 Foto 9: Llegados a este punto sólo tenemos que unir lo que denominábamos "espina dorsal" con la parte central del cuadradillo. Lo hacemos con tubo estructural de 50x30x3 mm (como no lo he conseguido "de gratis" he tenido que comprar 6 metros sólo, me sobran 5,5), curvándolo se adapta al basculante y al motor, se puntea y con ésto ya tenemos formada la cuna motor. El siguiente paso es fabricar el subchasis, que será el encargado de soportar nuestras delicadas posaderas.
At this point we have only to unite what blithely "backbone" with the central part of the square. We do so with structural tube of 50x30x3 mm (as i did not succeed free i have had to buy 6 meters only, i can spare 5.5 ), while curving adapts to the tilt and the engine, is plucked and with this we have already formed the cradle engine. The next step is to manufacture the small 'damper' rods, which shall be responsible for supporting our delicate backsides.
 Foto 10: Detalle del soporte motor trasero superior que fabricamos para sustituir los originales que perdimos al cortar el chasis. Va soldado al tubo que montamos en el paso anterior.
Detail of the support rear-engine higher that we manufacture to replace the originals that we lost to the cut the chassis. Is welded to the tube that we rode in the previous step.
.
.
.
Articulo redactado por "Pedroeltirao".
Article written by "Pedroeltirao".
sábado, 4 de septiembre de 2010
El velocímetro (Triumph Bonneville)
Estas vacaciones he aprovechado para acudir a Pedro "eltirao" con un problema en el velocímetro de la Bonneville. Todo surgió con un pequeño gruñido que cada vez fué a más no teniendo más remedio que desconectarlo, ya que la gente por la calle me miraba raro.
Además empezó a marcar velocidades irreales de 200 km/h cuando yo no he pasado de 140 km/h. Como es lógico al desconectar el velocímetro también deja de funcionar el cuentakilómetros total y el parcial, lo que supone no saber cuantos kilómetros llevo con el depósito y quedarme tirao sin gasolina.
 Pensé en un primer momento en cambiarlo y poner algo bonito más minimalista, pero viendo los precios acudí a Pedro para ver si se podía hacer algo, y así fué, con una "dremel" de los moros abrió el velocimetro gastando tres discos de corte de la misma marca.

 Después llegó el milagro de la química, bastó con dos chufladas de limpiacadenas y otras dos de grasa para que el artilugio volviera a su estado original, no sin antes probarlo metiéndole un taladro. Todo el conjunto quedó herméticamente sellado con silicona negra de juntas de motor, lo que garantiza su perfecto funcionamiento durante el tiempo que tarde en estropearse de nuevo.
Además empezó a marcar velocidades irreales de 200 km/h cuando yo no he pasado de 140 km/h. Como es lógico al desconectar el velocímetro también deja de funcionar el cuentakilómetros total y el parcial, lo que supone no saber cuantos kilómetros llevo con el depósito y quedarme tirao sin gasolina.
 Pensé en un primer momento en cambiarlo y poner algo bonito más minimalista, pero viendo los precios acudí a Pedro para ver si se podía hacer algo, y así fué, con una "dremel" de los moros abrió el velocimetro gastando tres discos de corte de la misma marca.

 Después llegó el milagro de la química, bastó con dos chufladas de limpiacadenas y otras dos de grasa para que el artilugio volviera a su estado original, no sin antes probarlo metiéndole un taladro. Todo el conjunto quedó herméticamente sellado con silicona negra de juntas de motor, lo que garantiza su perfecto funcionamiento durante el tiempo que tarde en estropearse de nuevo.
Queda en el recuerdo esa mañana de vacaciones sin cervezas (por celíaco) y sin rock & roll (también estaba estropeado el loro), pero con las mismas ilusiones con las que empezaron los pioneros del motor.
.
.
.
Artículo redactado por nuestro miembro "Bonneville".
miércoles, 28 de julio de 2010
Transformación Ducati Indiana: Parte 1. "El comienzo". Processing Ducati Indiana: Part 1. "The beginning"
Hola amigos de las transformaciones mierdas!!
A lo largo de los siguientes capítulos veremos como transformar una Ducati Indiana 650 dándole un caracter bobber:
Hello friends of the transformations shit!!
Over the following chapters we will see how to transform a Ducati Indiana 650 giving it a character bobber:
 Foto 1.- Esta es la moto. La "oveja negra" de Ducati, aborto entre Ducati y Cagiva. La custom más rara que te puedas echar a la cara, pero con su encanto.
This is the moto. The "black sheep" of Ducati, abortion between Ducati and Gruppo Cagiva. The custom more rare that you can get the face, but with its charm
 Foto 2.- Yo en Ruidera con la Ducati.
I in Ruidera with Ducati.
 Foto 3.- Se empieza por desmontar la moto en su totalidad. Sólo dejamos el motor, lo dejamos para que al cortar y puntear sujete el chasis en su sitio, y por lo menos los anclajes de éste no se muevan mucho. El fin es transformar el chasis de doble cuna dejándolo más sencillo en su parte trasera para colocar un asiento de muelles, que trataremos que se quede lo más bajo posible.
It begins by dismount the motorcycle in its totality. We allowed only the engine, we leave for the cut and plucked grasp the chassis in your site, and at least the anchorages of this do not move much. The purpose is to transform the chassis double-cradle leaving it simpler in the rear to place a seat of docks, that we will try to stick as low as possible.
 Foto 4.- Una vez terminado el desmontaje se tapa el motor, sobre todo las partes cromadas, por las "bulliscas". También trataremos de anclar el chasis donde podamos. Yo lo he atado al suelo con los ángulos y sujeté la pipa de la dirección a la pared. Con esto lo tenemos preparado para el paso más emocionante, cortar cachos de chasis. Procura cortar demás... que luego "pa" soldar tiempo hay.
Once finished the dismount cover the motor, mainly the chromed parts, by sparks. Also try to anchor the chassis where we can. I have tied to the ground with the angles and grasp the pipe in the direction of the wall. With this we have prepared for the step more exciting, cut pieces of chassis. It seeks to cut other ... that then for welding there are time.
.
.
.
Artículo redactado por nuestro miembro "Pedroeltirao".
Article written by our member "Pedroeltirao".
lunes, 5 de abril de 2010
Proyecto Gimson Polaris 49 cc.

Pues nada, que veo que ya va estando cerca el momento en el que me decida a empezar con la restauración de mi "Supergimson". Creo que ya va estando bien desde que me la dieran allá por el 1999.
A mi favor tengo que la moto me la dieron rulando perfectamente, y en contra tengo que lleva por ahí "tirá" los primeros 5 años al raso, cuidadosamente tapada con un plástico recio, y los otros 6 años a cubierto (se nota que vamos progresando), tapada con el mismo plástico recio.
Bueno, que de aquí a nada me véis con ella por la calle La Feria. :P
Pincha en la foto para verla mejor
Suscribirse a:
Entradas (Atom)


